Table of Contents
5 Exciting Projects to Try with Your YF B1 Arduino Board
The YF B1 Arduino board is a versatile and powerful tool that can be used for a wide range of projects. Whether you are a beginner looking to learn the basics of electronics and programming, or an experienced maker looking to take your projects to the next level, the YF B1 Arduino board has something to offer. In this article, we will explore five exciting projects that you can try with your YF B1 Arduino board.
One of the most popular projects that you can try with your YF B1 Arduino board is building a simple LED blinker. This project is a great way to learn the basics of programming and electronics, as it involves connecting an LED to the board and writing a simple program to make it blink on and off. By experimenting with different patterns and speeds, you can create a variety of cool effects that will impress your friends and family.
Another fun project that you can try with your YF B1 Arduino board is building a temperature and humidity sensor. This project involves connecting a sensor to the board and writing a program to read the data it collects. By displaying the temperature and humidity readings on an LCD screen or sending them to your computer, you can create a useful tool for monitoring the environment in your home or workspace.
If you are interested in robotics, you can use your YF B1 Arduino board to build a simple robot. By connecting motors, sensors, and other components to the board, you can create a robot that can move around and interact with its environment. By writing a program to control the robot’s movements, you can explore the exciting world of robotics and automation.
For those interested in music and sound, the YF B1 Arduino board can be used to build a simple synthesizer. By connecting buttons, knobs, and a speaker to the board, you can create a musical instrument that can produce a variety of sounds and melodies. By experimenting with different waveforms and effects, you can create your own unique musical creations that will impress your friends and family.
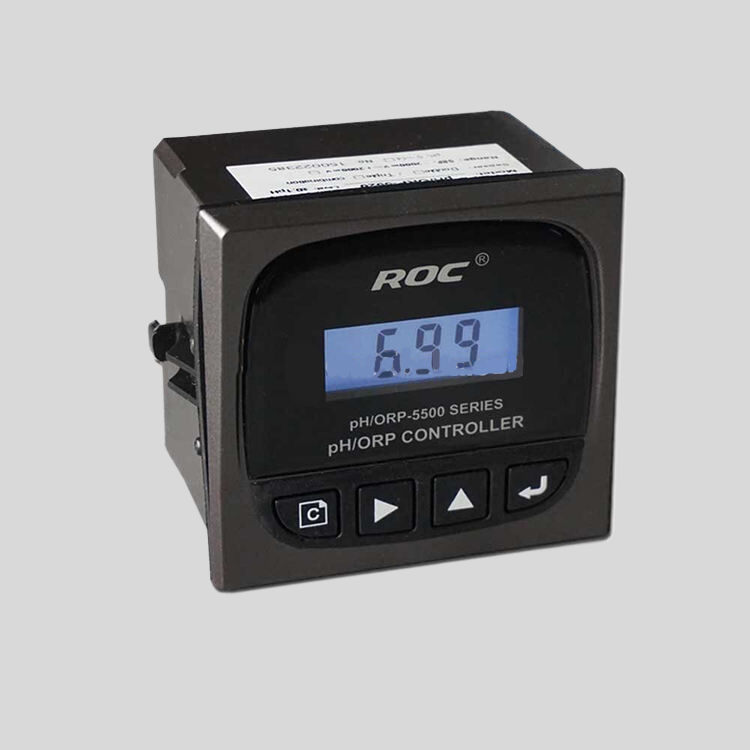
| Model | pH/ORP-5500 pH/ORP Online Meter |
| Range | pH:0.00~14.00 ; ORP: (-2000~+2000)mV; Temp.:(0.0~99.9)°C (Temp.Compensation: NTC10K) |
| Resolution | pH:0.01 ; ORP: 1mV; Temp.:0.1°C |
| Accuracy | pH:+/-0.1 ; ORP: +/-5mV(electronic unit); Temp.: +/-0.5°C |
| Temp. compensation | Range: (0~120)°C; element: Pt1000 |
| Buffer Solution | pH value 9.18; 6.86; 4.01; 10.00; 7.00; 4.00 |
| Medium Temp. | (0~50)°C (with 25°C as standard) manual/automatic temp. compensation for selection |
| Analog output | Isolated (4~20)mA, Instrument/Transmitter for selection |
| Control Output | Double relay output (ON/OFF); AC 240V/3A |
| Working Environment | Temp.(0~50)℃; relative humidity <95%RH (non-condensing) |
| Storage Environment | Temp.(-20~60)℃;Relative Humidity ≤85%RH (none condensation) |
| Power Supply | DC 24V; AC 110V; AC220V |
| Power consumption | <3W |
| Protection level | IP65 (with back cover) |
| Dimension | 96mmx96mmx105mm(HxWxD) |
| Hole Size | 91mmx91mm(HxW) |
Finally, if you are interested in home automation, you can use your YF B1 Arduino board to build a smart home system. By connecting sensors, actuators, and other components to the board, you can create a system that can control lights, appliances, and other devices in your home. By writing a program to automate tasks such as turning on lights when it gets dark or adjusting the thermostat based on the temperature, you can create a more convenient and efficient living space.
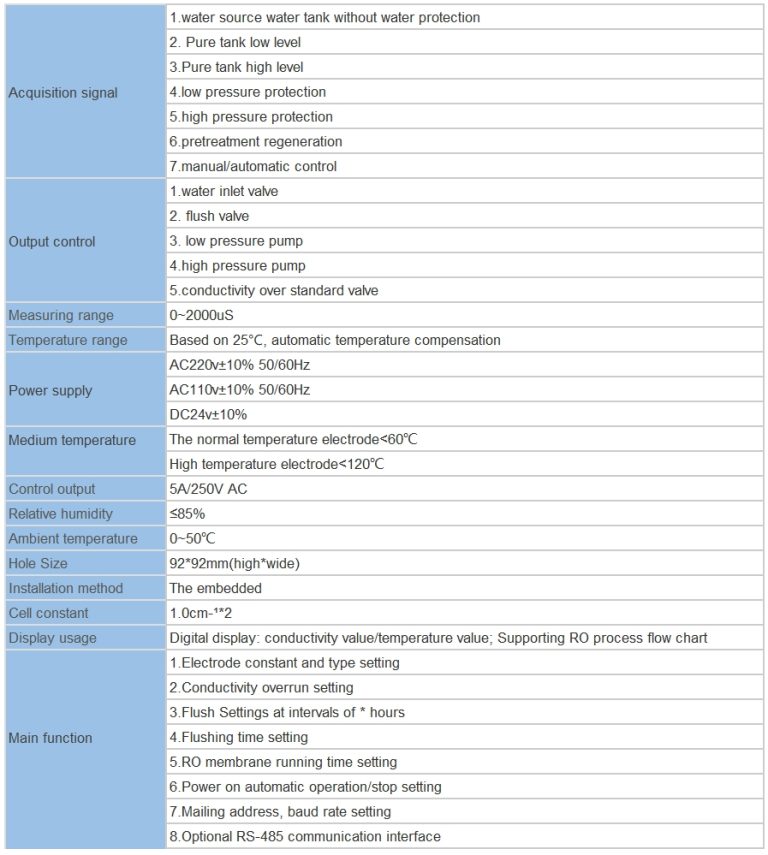
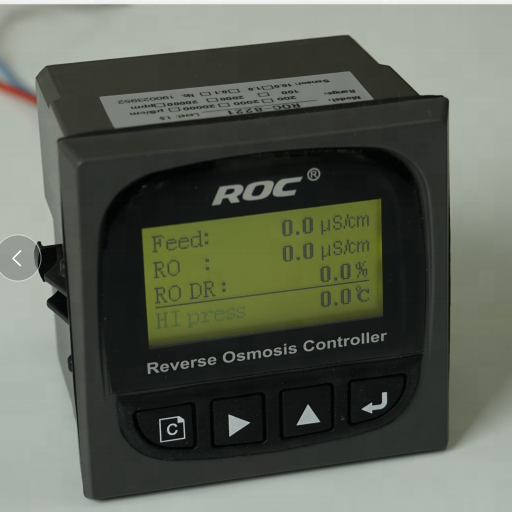
| Model | EC-8851/EC-9900 High Precision Conductivity/resistivity controller |
| Range | 0-200/2000/4000/10000uS/cm |
| 0-20/200mS/cm 0-18.25MΩ | |
| Accuracy | Conductivity:1.5%; Resistivity:2.0%(FS) |
| Temp. Comp. | Automatic temperature compensation based on 25℃ |
| Oper. Temp. | Normal 0~50℃; High temp 0~120℃ |
| Sensor | 0.01/0.02/0.1/1.0/10.0cm-1 |
| Display | LCD Screen |
| Current Output | 4-20mA output/2-10V/1-5V |
| Output | High/Low limit dual relay control |
| Power | DC24V/0.5A or |
| AC85-265V±10% 50/60Hz | |
| Working Environment | Ambient temperature:0~50℃ |
| Relative humidity≤85% | |
| Dimensions | 96×96×72mm(H×W×L) |
| Hole Size | 92×92mm(H×W) |
| Installation Mode | Embedded |
In conclusion, the YF B1 Arduino board is a versatile and powerful tool that can be used for a wide range of projects. Whether you are a beginner looking to learn the basics of electronics and programming, or an experienced maker looking to take your projects to the next level, the YF B1 Arduino board has something to offer. By trying out the five exciting projects mentioned in this article, you can explore the endless possibilities of this amazing tool and unleash your creativity.
How to Get Started with YF B1 Arduino: A Beginner’s Guide
Arduino is a popular open-source platform that allows users to create interactive electronic projects. One of the many Arduino boards available is the YF B1 Arduino, which is a great option for beginners looking to get started with electronics and programming. In this article, we will provide a beginner’s guide on how to get started with the YF B1 Arduino.
The first step in getting started with the YF B1 Arduino is to familiarize yourself with the board and its components. The YF B1 Arduino is a compact board that features a microcontroller, digital and analog pins, and various other components that allow you to connect sensors, motors, and other electronic devices. It is important to understand the layout of the board and the function of each component before you begin working on your projects.
Once you have familiarized yourself with the YF B1 Arduino board, the next step is to set up the Arduino software on your computer. The Arduino software, also known as the Integrated Development Environment (IDE), is where you will write and upload code to the YF B1 Arduino board. You can download the Arduino IDE for free from the Arduino website and install it on your computer.
After installing the Arduino IDE, you can connect the YF B1 Arduino board to your computer using a USB cable. Once the board is connected, you can select the correct board and port in the Arduino IDE settings. This will allow you to upload code to the YF B1 Arduino board and communicate with it from your computer.
Now that you have set up the Arduino software and connected the YF B1 Arduino board to your computer, you can start writing code for your projects. The Arduino programming language is based on C/C++ and is relatively easy to learn for beginners. You can find a wide range of tutorials and examples online to help you get started with programming the YF B1 Arduino board.
When writing code for the YF B1 Arduino board, it is important to understand the basic concepts of programming, such as variables, loops, and functions. These concepts will help you write efficient and effective code for your projects. You can also make use of libraries and code snippets to simplify your programming tasks and speed up the development process.
Once you have written your code, you can upload it to the YF B1 Arduino board using the Arduino IDE. The code will be compiled and uploaded to the board, where it will run and interact with the connected electronic devices. You can monitor the output of your code using the serial monitor in the Arduino IDE, which allows you to view messages and data sent by the YF B1 Arduino board.
In conclusion, getting started with the YF B1 Arduino board is a great way for beginners to learn about electronics and programming. By familiarizing yourself with the board, setting up the Arduino software, writing code, and uploading it to the board, you can start creating your own interactive electronic projects. With practice and experimentation, you can develop your skills and create more complex and exciting projects with the YF B1 Arduino.