Panduan Langkah demi Langkah untuk Memasang Katup Multiport Pentair
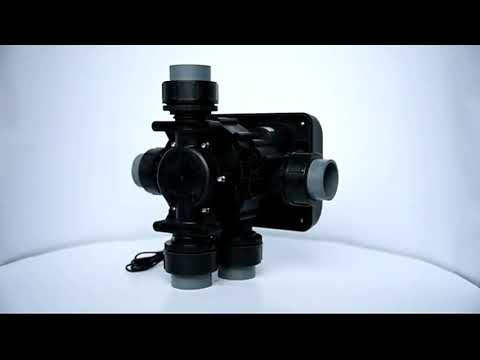
Memasang katup multiport Pentair adalah langkah penting dalam menjaga sistem filtrasi kolam Anda. Katup ini memungkinkan Anda dengan mudah beralih di antara berbagai fungsi seperti penyaringan, pencucian balik, pembilasan, dan banyak lagi. Dalam panduan langkah demi langkah ini, kami akan memandu Anda melalui proses pemasangan katup multiport Pentair untuk memastikan kolam Anda tetap bersih dan bersih sepanjang musim.
Sebelum Anda memulai proses pemasangan, penting untuk mengumpulkan semua alat dan bahan yang diperlukan. Anda memerlukan obeng, kunci pas pipa, selotip teflon, lem PVC, dan tentu saja katup multiport Pentair itu sendiri. Pastikan untuk membaca instruksi pabrik dengan seksama sebelum memulai pemasangan untuk memastikan bahwa Anda mengikuti langkah-langkah yang benar.
Langkah pertama dalam memasang katup multiport Pentair adalah mematikan aliran listrik ke pompa kolam. Ini penting untuk keselamatan Anda dan untuk mencegah kerusakan pada peralatan. Setelah listrik mati, Anda bisa mulai dengan mengalirkan air dari tangki filter. Hal ini dapat dilakukan dengan membuka sumbat pembuangan di bagian bawah tangki dan membiarkan air mengalir keluar.
Selanjutnya, Anda perlu melepas katup lama dari tangki filter. Hal ini dapat dilakukan dengan melonggarkan klem yang menahan katup pada tempatnya dan menariknya keluar secara hati-hati. Pastikan untuk memeriksa O-ring pada katup lama dan menggantinya jika perlu untuk mencegah kebocoran di kemudian hari.
Setelah katup lama dilepas, Anda dapat mulai memasang katup multiport Pentair yang baru. Mulailah dengan menempelkan selotip Teflon ke ulir katup untuk memastikan segelnya rapat. Kemudian, masukkan katup dengan hati-hati ke dalam lubang pada tangki filter dan kencangkan di tempatnya dengan penjepit yang disediakan.
Setelah katup terpasang dengan benar, Anda dapat mulai menyambungkan pipa. Gunakan kunci pipa untuk mengencangkan sambungan dan memastikan tidak ada kebocoran. Setelah pipa tersambung, Anda bisa mengoleskan lem PVC pada sambungannya untuk membuat segel kedap air.
Setelah semua sambungan aman, Anda bisa mulai mengisi tangki filter dengan air. Hal ini dapat dilakukan dengan membuka katup pelepas udara di atas tangki dan membiarkan air mengalir masuk. Setelah tangki penuh, Anda dapat menghidupkan kembali daya pompa kolam dan menguji katup untuk memastikannya berfungsi dengan baik. .
| Model: dan nbsp;Otomatis dan nbsp;Pelembut dan nbsp;Katup | ASE2 -LCD/LED dan nbsp; dan nbsp; dan nbsp; dan nbsp; dan nbsp; | |
| Jenis pengisian ulang | dan nbsp; dan nbsp; dan nbsp; dan nbsp;isi ulang sebelum regenerasi dan nbsp; dan nbsp; | isi ulang setelah regenerasi |
| Posisi Kerja dan nbsp; | Layanan- dan gt;Isi ulang air pelembut- dan gt;Layanan- dan gt;Pencucian Kembali- dan gt;Air Garam Aliran Atas dan bilas lambat- dan gt;Bilas cepat- dan gt;Layanan | Servis- dan gt;Back Wash- dan gt;Upflow Brine dan bilas lambat- dan gt; Bilas cepat- dan gt; Isi ulang pelembut dan nbsp; dan nbsp;air- dan gt;Layanan |
| Jenis otomatis dan nbsp; | Jenis otomatis dan nbsp; | |
| Penundaan Meter dan nbsp; | Penundaan Meter dan nbsp; | |
| Mode regenerasi | Penundaan Pengukur Cerdas | Meter langsung |
| Pengatur waktu berdasarkan hari : dan nbsp;0-99 dan nbsp;hari dan nbsp; | Penundaan Pengukur Cerdas | |
| Pengatur waktu per jam: 0-99 jam dan nbsp; | Pengukur Cerdas Segera | |
| Pengatur waktu berdasarkan hari : dan nbsp;0-99 dan nbsp;hari dan nbsp; | ||
| Pengatur waktu per jam: 0-99 jam | ||
| Pintu masuk | 1/2” dan nbsp;3/4” dan nbsp;1” dan nbsp; | |
| Jalur Keluar | 1/2” dan nbsp;3/4” dan nbsp;1” dan nbsp; | |
| Tiriskan | 1/2” dan nbsp; | |
| Dasar | 2-1/2” | |
| Pipa Riser | 1,05” OD | |
| Kapasitas Air | 2m3/h | |
| Tekanan Kerja | 0,15-0,6Mpa | |
| Suhu Kerja | 5-50°C | |
| Catu Daya | AC100-240 / 50-60Hz dan nbsp; dan nbsp; / dan nbsp; dan nbsp; dan nbsp; DC12V-1.5A dan nbsp; | |
Kesimpulannya, memasang katup multiport Pentair adalah proses yang relatif sederhana yang dapat diselesaikan hanya dalam beberapa jam. Dengan mengikuti langkah-langkah yang diuraikan dalam panduan ini, Anda dapat memastikan bahwa sistem penyaringan kolam Anda bekerja secara efisien dan efektif. Ingatlah untuk selalu membaca instruksi pabriknya dan mengambil tindakan pencegahan keselamatan yang tepat saat bekerja dengan peralatan kolam renang. Dengan katup multiport yang terpasang dengan benar, Anda dapat menikmati kolam yang bersih dan jernih sepanjang musim.