Table of Contents
Proper Techniques for Attaching PVC Conduit to an Electrical Panel
When it comes to electrical work, proper installation is crucial to ensure safety and efficiency. One important aspect of electrical installations is connecting PVC conduit to an electrical panel. PVC conduit is commonly used to protect and route electrical wiring in both residential and commercial settings. In this article, we will discuss the proper techniques for attaching PVC conduit to an electrical panel.
| Brand | Chimay Itiger |
| Certification | NSF |
| Material | POM |
| Color | Grey/White |
Before beginning any electrical work, it is important to ensure that you have the necessary tools and materials. For connecting PVC conduit to an electrical panel, you will need PVC conduit, PVC connectors, a hacksaw or PVC cutter, a deburring tool, a screwdriver, and PVC cement. It is also important to follow all local building codes and regulations when performing electrical work.
The first step in connecting PVC conduit to an electrical panel is to measure and cut the conduit to the appropriate length. Use a hacksaw or PVC cutter to make a clean, straight cut. It is important to measure carefully to ensure a proper fit. Once the conduit is cut to size, use a deburring tool to remove any rough edges or burrs from the cut end of the conduit.
Next, insert the cut end of the conduit into a PVC connector. Make sure the conduit is fully inserted into the connector to ensure a secure connection. Use a screwdriver to tighten the connector onto the conduit. Repeat this process for any additional pieces of conduit that need to be connected.
Once all of the conduit pieces are connected, it is time to attach the conduit to the electrical panel. Position the conduit next to the panel and mark the location of the mounting holes on the panel. Use a drill to create pilot holes for the mounting screws. Secure the conduit to the panel using the mounting screws.
After the conduit is securely attached to the electrical panel, it is important to seal the connections to prevent moisture and debris from entering the conduit. Apply PVC cement to the inside of the connector where it meets the conduit. This will create a watertight seal and ensure a secure connection.
In conclusion, connecting PVC conduit to an electrical panel is an important step in any electrical installation. By following the proper techniques outlined in this article, you can ensure a safe and efficient connection. Remember to measure and cut the conduit carefully, use PVC connectors to secure the conduit, and seal the connections with PVC cement. Always follow local building codes and regulations when performing electrical work. With the right tools and materials, you can successfully connect PVC conduit to an electrical panel.
Step-by-Step Guide for Connecting PVC Conduit to an Electrical Panel
When it comes to electrical work, it is important to ensure that all components are properly connected to avoid any safety hazards. One common task that electricians often encounter is connecting PVC conduit to an electrical panel. PVC conduit is a popular choice for protecting electrical wires and cables, as it is durable, lightweight, and resistant to corrosion. In this article, we will provide a step-by-step guide on how to connect PVC conduit to an electrical panel.
The first step in connecting PVC conduit to an electrical panel is to gather all the necessary materials and tools. You will need PVC conduit, PVC connectors, a hacksaw, a utility knife, a tape measure, a pencil, and PVC cement. Make sure that you have the correct size of conduit and connectors for your project.
Next, measure and cut the PVC conduit to the desired length using a hacksaw. Be sure to measure carefully and make precise cuts to ensure a proper fit. Use a utility knife to remove any burrs or rough edges from the cut end of the conduit.
Once the conduit is cut to size, insert one end of the conduit into a PVC connector. Make sure that the conduit is fully inserted into the connector to create a secure connection. Use a pencil to mark the depth of the conduit inside the connector for reference.
Apply PVC cement to the inside of the connector and the outside of the conduit. Be sure to follow the manufacturer’s instructions for the proper application of the cement. Insert the conduit into the connector and twist it slightly to ensure a tight bond. Hold the conduit in place for a few seconds to allow the cement to set.
Repeat this process for the other end of the conduit, connecting it to another PVC connector. Again, make sure that the conduit is fully inserted into the connector and that the cement is applied correctly. Allow the cement to dry completely before moving on to the next step.
With both ends of the conduit connected to PVC connectors, you are now ready to attach the conduit to the electrical panel. Position the conduit near the panel and mark the locations for the mounting holes. Use a drill to create the holes, making sure to use the appropriate size drill bit for the mounting screws.
Secure the conduit to the electrical panel using mounting screws. Make sure that the conduit is securely attached and does not move or shift. Double-check all connections to ensure that they are tight and secure.
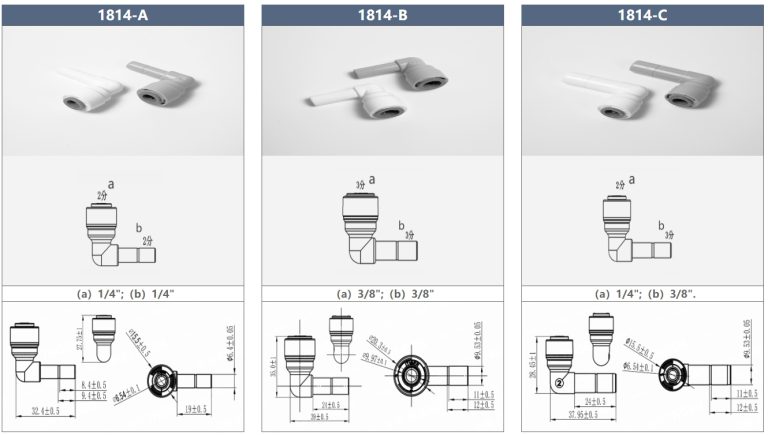
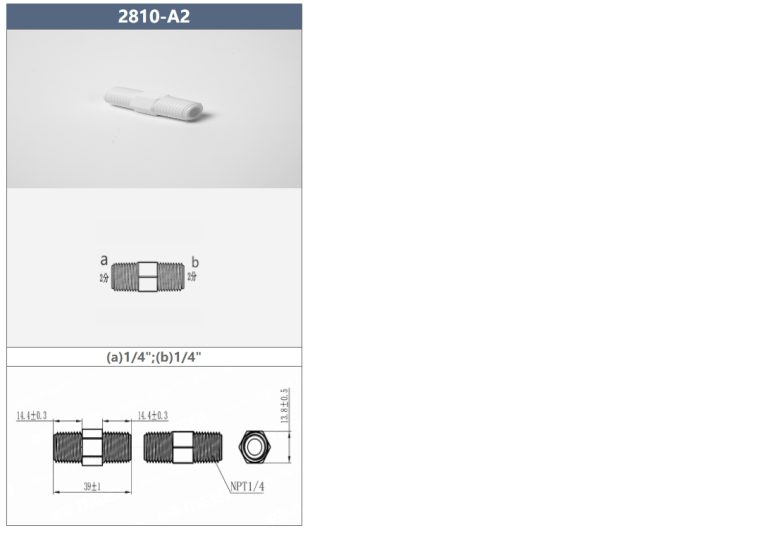
| Model | Tube(a) | Stem(b) |
|---|---|---|
| 1801-A | 1/4 | 1/4 |
| 1801-C | 1/4 | 3/14 |
Finally, run the electrical wires or cables through the PVC conduit and into the electrical panel. Make sure that the wires are properly insulated and secured inside the conduit. Close the panel cover and test the connections to ensure that everything is working properly.
In conclusion, connecting PVC conduit to an electrical panel is a straightforward process that can be completed with the right materials and tools. By following this step-by-step guide, you can ensure that your electrical connections are safe and secure. Remember to always follow safety guidelines and consult a professional if you are unsure about any aspect of the installation process.