Table of Contents
Proper Techniques for Attaching PVC Conduit to an Electrical Box
PVC conduit is a popular choice for protecting electrical wiring in both residential and commercial settings. When installing PVC conduit, it is essential to ensure that it is properly connected to the electrical box to maintain a safe and secure electrical system. In this article, we will discuss the proper techniques for attaching PVC conduit to an electrical box.
One of the first steps in connecting PVC conduit to an electrical box is to measure and cut the conduit to the appropriate length. It is important to ensure that the conduit is cut straight and without any jagged edges to ensure a proper fit. Once the conduit is cut to size, it is essential to remove any burrs or rough edges using a deburring tool to prevent damage to the wires during installation.
After preparing the conduit, the next step is to attach it to the electrical box. One common method for connecting PVC conduit to an electrical box is to use PVC fittings. These fittings are designed to securely attach the conduit to the box while providing a watertight seal to protect the wiring inside. To attach the conduit using PVC fittings, simply insert the conduit into the fitting and tighten the locking nut to secure it in place.
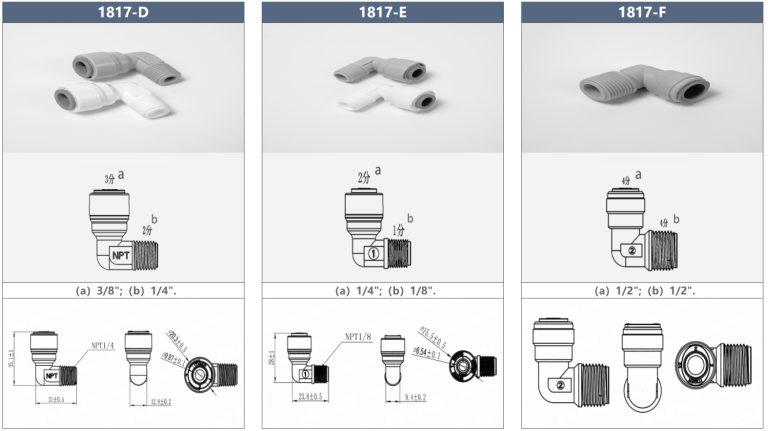
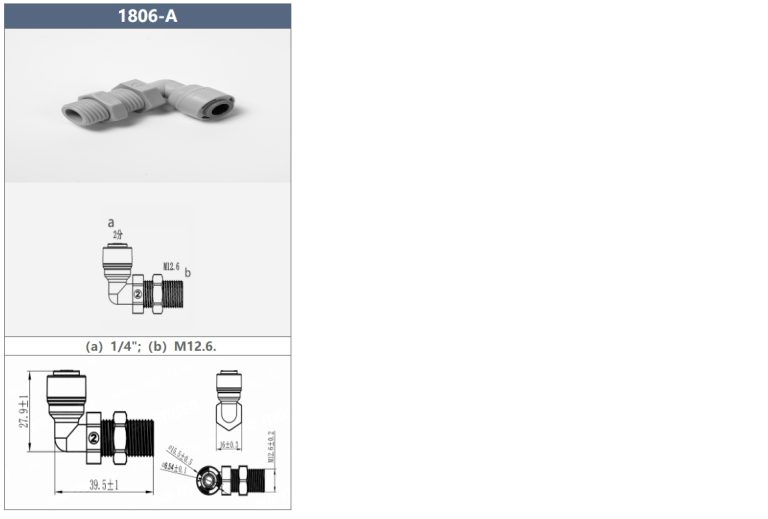
| Model | Tube(a) | Stem(b) |
|---|---|---|
| 1801-A | 1/4 | 1/4 |
| 1801-C | 1/4 | 3/15 |
Another method for connecting PVC conduit to an electrical box is to use PVC glue. PVC glue is a solvent-based adhesive that creates a strong bond between the conduit and the box. To use PVC glue, simply apply a thin layer of glue to both the conduit and the box, then insert the conduit into the box and hold it in place until the glue sets. It is important to follow the manufacturer’s instructions when using PVC glue to ensure a proper and secure connection.
In addition to using PVC fittings or glue, it is also important to secure the conduit to the electrical box using straps or clamps. These devices help to prevent the conduit from coming loose or shifting over time, which can lead to damage to the wiring inside. When installing straps or clamps, be sure to space them evenly along the length of the conduit to provide adequate support.
Once the conduit is securely attached to the electrical box, it is important to test the connection to ensure that it is secure and watertight. This can be done by gently pulling on the conduit to check for any movement or looseness. If the conduit feels secure, it is ready for use. However, if there is any movement or looseness, additional steps may be needed to reinforce the connection.
In conclusion, connecting PVC conduit to an electrical box is a crucial step in ensuring the safety and functionality of an electrical system. By following the proper techniques for attaching PVC conduit, such as measuring and cutting the conduit accurately, using PVC fittings or glue, and securing the conduit with straps or clamps, you can create a secure and reliable connection that will protect your wiring for years to come. Remember to always follow manufacturer’s instructions and safety guidelines when working with electrical systems to prevent accidents and ensure a successful installation.
Step-by-Step Guide for Connecting PVC Conduit to an Electrical Box
PVC conduit is a popular choice for protecting electrical wiring in both residential and commercial settings. It is durable, lightweight, and easy to work with, making it a preferred option for many electricians and DIY enthusiasts. One of the key steps in installing PVC conduit is connecting it to an electrical box. This ensures that the wiring is properly protected and secured, preventing any potential hazards.
To connect PVC conduit to an electrical box, you will need a few tools and materials. These include PVC conduit, an electrical box, PVC cement, a hacksaw, a tape measure, a pencil, and a deburring tool. Before you begin, make sure to turn off the power to the electrical box to avoid any accidents.
| Model | Tube(a) | Stem(b) |
|---|---|---|
| 1801-A | 1/4 | 1/4 |
| 1801-C | 1/4 | 3/41 |
The first step is to measure and cut the PVC conduit to the desired length. Use a tape measure to determine the length needed, and mark the conduit with a pencil. Then, use a hacksaw to carefully cut the conduit to size. Make sure to wear safety goggles and gloves to protect yourself from any debris.

Next, use a deburring tool to remove any rough edges from the cut end of the conduit. This will ensure a smooth and secure connection to the electrical box. Once the conduit is cut and deburred, it is time to connect it to the electrical box.
Apply PVC cement to the end of the conduit and the inside of the electrical box. Make sure to follow the manufacturer’s instructions for the proper application of the cement. Then, insert the conduit into the electrical box and twist it slightly to ensure a tight fit. Hold the conduit in place for a few seconds to allow the cement to set.
Once the conduit is securely connected to the electrical box, you can proceed with running the wiring through the conduit. Make sure to follow all local building codes and regulations when installing the wiring. It is important to ensure that the wiring is properly secured and protected within the conduit to prevent any damage or accidents.
In conclusion, connecting PVC conduit to an electrical box is a straightforward process that can be completed with a few simple tools and materials. By following the steps outlined in this guide, you can ensure that your electrical wiring is properly protected and secured. Remember to always prioritize safety when working with electricity and consult a professional if you are unsure about any aspect of the installation process. With the right tools and knowledge, you can successfully connect PVC conduit to an electrical box and complete your electrical project with confidence.