Table of Contents
Importance of Regular Calibration for conductivity meter SOP
Calibration of a conductivity meter is a critical step in ensuring accurate and reliable measurements. Standard Operating Procedures (SOPs) for calibration are essential to maintain the integrity of the data collected and to ensure that the instrument is functioning properly. Regular calibration of a conductivity meter is necessary to guarantee the accuracy of the readings and to detect any potential issues with the instrument.
One of the primary reasons for calibrating a conductivity meter is to ensure that the instrument is providing accurate measurements. Conductivity meters are used to measure the ability of a solution to conduct electricity, which is directly related to the concentration of ions present in the solution. If the conductivity meter is not properly calibrated, it can lead to inaccurate readings, which can have serious consequences in various industries such as pharmaceuticals, food and beverage, and environmental monitoring.
Regular calibration of a conductivity meter is also essential for detecting any potential issues with the instrument. Over time, conductivity meters can drift out of calibration due to factors such as temperature fluctuations, exposure to contaminants, or general wear and tear. By calibrating the instrument regularly, any deviations from the expected values can be identified and corrected before they impact the accuracy of the measurements.
The SOP for calibration of a conductivity meter outlines the specific procedures that need to be followed to ensure that the instrument is calibrated correctly. This includes steps such as preparing the calibration standards, adjusting the instrument settings, and verifying the accuracy of the readings. Following the SOP ensures that the calibration process is standardized and consistent, which is essential for maintaining the reliability of the measurements.
In addition to following the SOP, it is also important to document the calibration process. This includes recording the date and time of the calibration, the calibration standards used, and the results of the calibration. Keeping detailed records of the calibration process is essential for traceability and quality control purposes. It allows for easy identification of when the instrument was last calibrated and provides a history of the instrument’s performance over time.
Regular calibration of a conductivity meter is not only important for ensuring accurate measurements and detecting potential issues with the instrument, but it is also a requirement for compliance with industry regulations and standards. Many industries have specific guidelines for the calibration of instruments, including conductivity meters, to ensure the quality and reliability of the data collected. Failure to comply with these regulations can result in fines, loss of accreditation, or even legal action.
In conclusion, regular calibration of a conductivity meter is essential for maintaining the accuracy and reliability of the measurements. Following the SOP for calibration and documenting the calibration process are critical steps in ensuring that the instrument is functioning properly and providing accurate readings. By calibrating the conductivity meter regularly, potential issues can be detected and corrected before they impact the quality of the data collected. Compliance with industry regulations and standards is also a key reason for ensuring that conductivity meters are calibrated regularly. Overall, calibration of a conductivity meter SOP is a crucial aspect of ensuring the integrity of the data collected and maintaining the quality of the measurements.
Step-by-Step Guide for Conductivity Meter Calibration SOP
Calibration of a conductivity meter is a crucial step in ensuring accurate and reliable measurements of conductivity in a solution. Standard Operating Procedures (SOPs) are essential documents that provide step-by-step instructions for performing tasks in a consistent and standardized manner. In this article, we will provide a detailed guide for calibrating a conductivity meter following a SOP.
The first step in the calibration process is to gather all the necessary equipment and materials. This includes the conductivity meter, calibration standards (usually 1.41 mS/cm and 12.88 mS/cm), distilled water, beakers, and a stir plate. It is important to ensure that the calibration standards are fresh and have not expired.
Once all the equipment is ready, the next step is to prepare the calibration standards. Start by labeling two beakers with the appropriate standard concentrations. Fill one beaker with the 1.41 mS/cm standard and the other with the 12.88 mS/cm standard. Make sure to use enough solution to fully submerge the conductivity probe.
After preparing the calibration standards, it is time to calibrate the conductivity meter. Start by turning on the meter and allowing it to warm up for a few minutes. Once the meter is ready, dip the probe into the 1.41 mS/cm standard solution and allow it to stabilize. The meter should display a reading close to the expected value of 1.41 mS/cm. If the reading is off, adjust the calibration settings on the meter until the correct value is displayed.

After calibrating the meter with the 1.41 mS/cm standard, rinse the probe with distilled water and repeat the process with the 12.88 mS/cm standard solution. Again, allow the meter to stabilize and adjust the calibration settings if necessary to ensure an accurate reading.
Once the conductivity meter has been calibrated with both standard solutions, it is important to rinse the probe with distilled water to remove any residue from the calibration process. This will help prevent contamination of future samples and ensure accurate measurements.
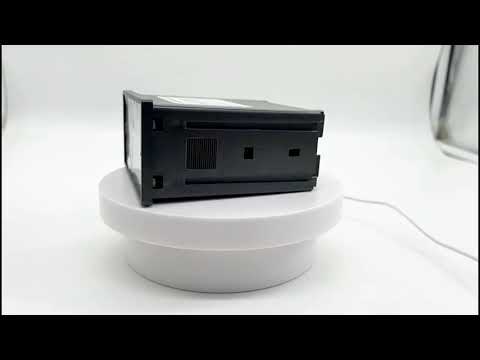
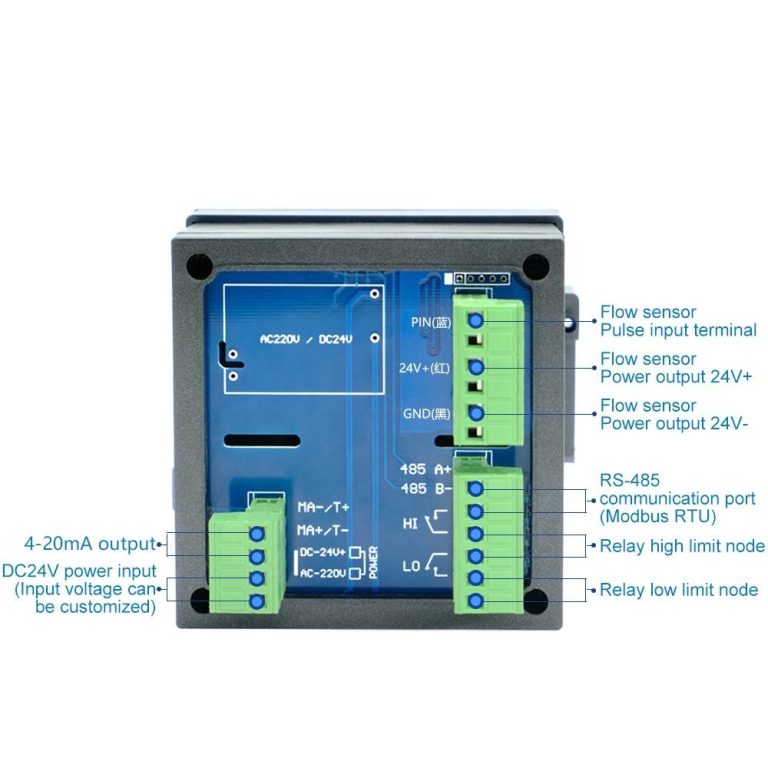
| Model | CM-230S Ecomonical conductivity monitor |
| Range | 0-200/2000/4000/10000uS/cm |
| 0-100/1000/2000/5000PPM | |
| Accuracy | 1.5%(FS) |
| Temp. Comp. | Automatic temperature compensation based on 25\\u2103 |
| Oper. Temp. | Normal 0\\uff5e50\\u2103; High temp 0\\uff5e120\\u2103 |
| Sensor | Standard:ABS C=1.0cm-1 (others are optional) |
| Display | LCD Screen |
| Zero Correction | Manual correction for low range 0.05-10ppm Set from ECO |
| Unit Display | uS/cm or PPM |
| Power | AC 220V\\u00b110% 50/60Hz or AC 110V\\u00b110% 50/60Hz or DC24V/0.5A |
| Working Environment | Ambient temperature:0\\uff5e50\\u2103 |
| Relative humidity\\u226485% | |
| Dimensions | 48\\u00d796\\u00d7100mm(H\\u00d7W\\u00d7L) |
| Hole Size | 45\\u00d792mm(H\\u00d7W) |
| Installation Mode | Embedded |
Finally, record the calibration results in a logbook or calibration record. Include the date, time, calibration standards used, and any adjustments made to the meter settings. This documentation is important for traceability and quality control purposes.
In conclusion, calibrating a conductivity meter following a SOP is a critical step in ensuring accurate and reliable measurements of conductivity in a solution. By following the step-by-step guide outlined in this article, you can perform the calibration process with confidence and precision. Remember to always use fresh calibration standards, rinse the probe between calibrations, and record the results for documentation purposes. Calibration is key to maintaining the accuracy and integrity of your conductivity measurements.